
Anyone who before using a Mac using a Windows or Linux PC knows the Print Screen key. This is the key used in the mentioned systems to make screenshots, but in Mac computers it is not present. To make screenshots in Mac with OS X we must use another combination of keys that, perhaps it is not so evident, but it allows us many more options at the time of capturing the complete screen of the equipment or only a certain part of it.
Learning the keyboard combinations necessary to make screen shots on Mac is a bit more complicated than on Windows and if we do not have a good memory it is possible that it takes us a while to get used to it. Despite this, once we get used to it we will not want to go back and that is that the options that OS X gives us natively to take screenshots are not available on any other platform, at least not today.
Using third-party software we can further expand the possibilities, but then we will focus on explaining the different options to make screenshots natively on Mac, that is, using the options included in the current versions of OS X.
4 ways to do screenshots on Mac (Screenshots)
Command (CMD) + Shift (uppercase) + 3: this keyboard shortcut will make a screenshot of everything we have in the moment on the screen. We could say that it is the equivalent of Print screen on a PC.
Command (CMD) + Shift (upper case) + 4: pressing this keyboard shortcut we will see that the mouse course changes and allows us to select a portion of the screen. To do this, we must simply click where we want to start selecting and dragging. When we release the mouse button, the screenshot of only that portion will be made.
Command (CMD) + Shift (upper case) + 4 and then spacebar: with this option we can capture only a specific window. When we execute it, we will see that the mouse cursor changes and takes the form of a camera. When we pass it over any window we will see how it is selected and if we click on it, it will capture it. These captures include, in addition to the window itself, the shadow we see in the OS X windows. These screenshots are perfect for accompanying tutorials or presentations.
These are the three most common options to make screenshots on Mac. All of them result in a file on the desktop in PNG format with the full screen or the part that we selected in case of using the second or third shortcut, although if we wish we can change the format or location of the captures. If we do not want our Mac to generate this file automatically, we can add the Control key to the previous shortcuts. That way the image will be saved in the clipboard and we can paste it into the software we want later. Very useful if, for example, we want to edit the screenshot in Pixelmator or Photoshop among others.
Movavi, another way to make screenshots on Mac
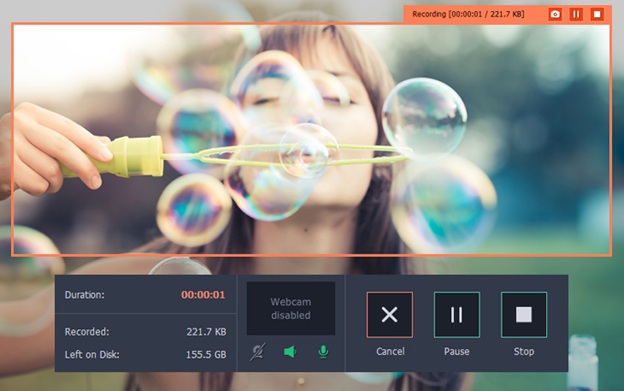
There is one more alternative to make these screenshots on Mac, the Movavi Screen Capture Video for Mac. This software is one of the best software for all screenshots. Movavi Screen Capture Video for Mac allows you to record your desktop as a whole with all the activity on its surface. Not only do “screenshoting”, this www.movavi.com/Mac-screen-capture application is also able to improve the quality of each screenshot results. Data storage is one of the classic problems commonly encountered as not all files are compatible with our disks. With Movavi for Mac, we do not need to ignore this problem anymore because every screenshot can be saved to any device.


Comments